If a flash left distracting glare, reflections, or shiny hotspots in your picture, how to remove flash from photo depends on one simple thing: whether the bright area still contains usable detail. Small glare patches on glasses, skin, windows, or glossy objects are often fixable. Large white blowouts across important parts of the image are much harder, and sometimes a retake is the better answer.
This guide explains what people usually mean by “flash” in a photo, when editing is realistic, and how to clean up the distraction in TouchRetouch on iPhone or Android. The goal is not to promise impossible recovery. It is to help you make the photo look more natural with honest, practical retouching.
What people mean by “flash” in a photo
Flash glare vs lens flare vs bright reflections
When people search for how to remove flash from photo, they usually do not mean the camera flash itself. They mean the visual side effects: a bright white spot on glasses, a shiny patch on skin, a reflection in a window, or a blown-out highlight on a glossy surface.
These problems are related, but they are not identical. Direct flash glare is a hotspot caused by light bouncing straight back into the camera. Lens flare usually comes from strong light hitting the lens and creating haze, circles, or streaks. Bright reflections can come from flash, lamps, sunlight, mirrors, polished furniture, or glass.
That difference matters because each issue edits differently. A tiny glare spot on a cheek often blends away well. A flare streak crossing a face is much more difficult because it changes color, contrast, and texture over a larger area.
Why some hotspots are editable and others are not
The key question is whether the bright area still contains image information. If the hotspot is bright but you can still see texture underneath, editing has something to work with. If the area is pure white with no texture at all, the original detail is gone.
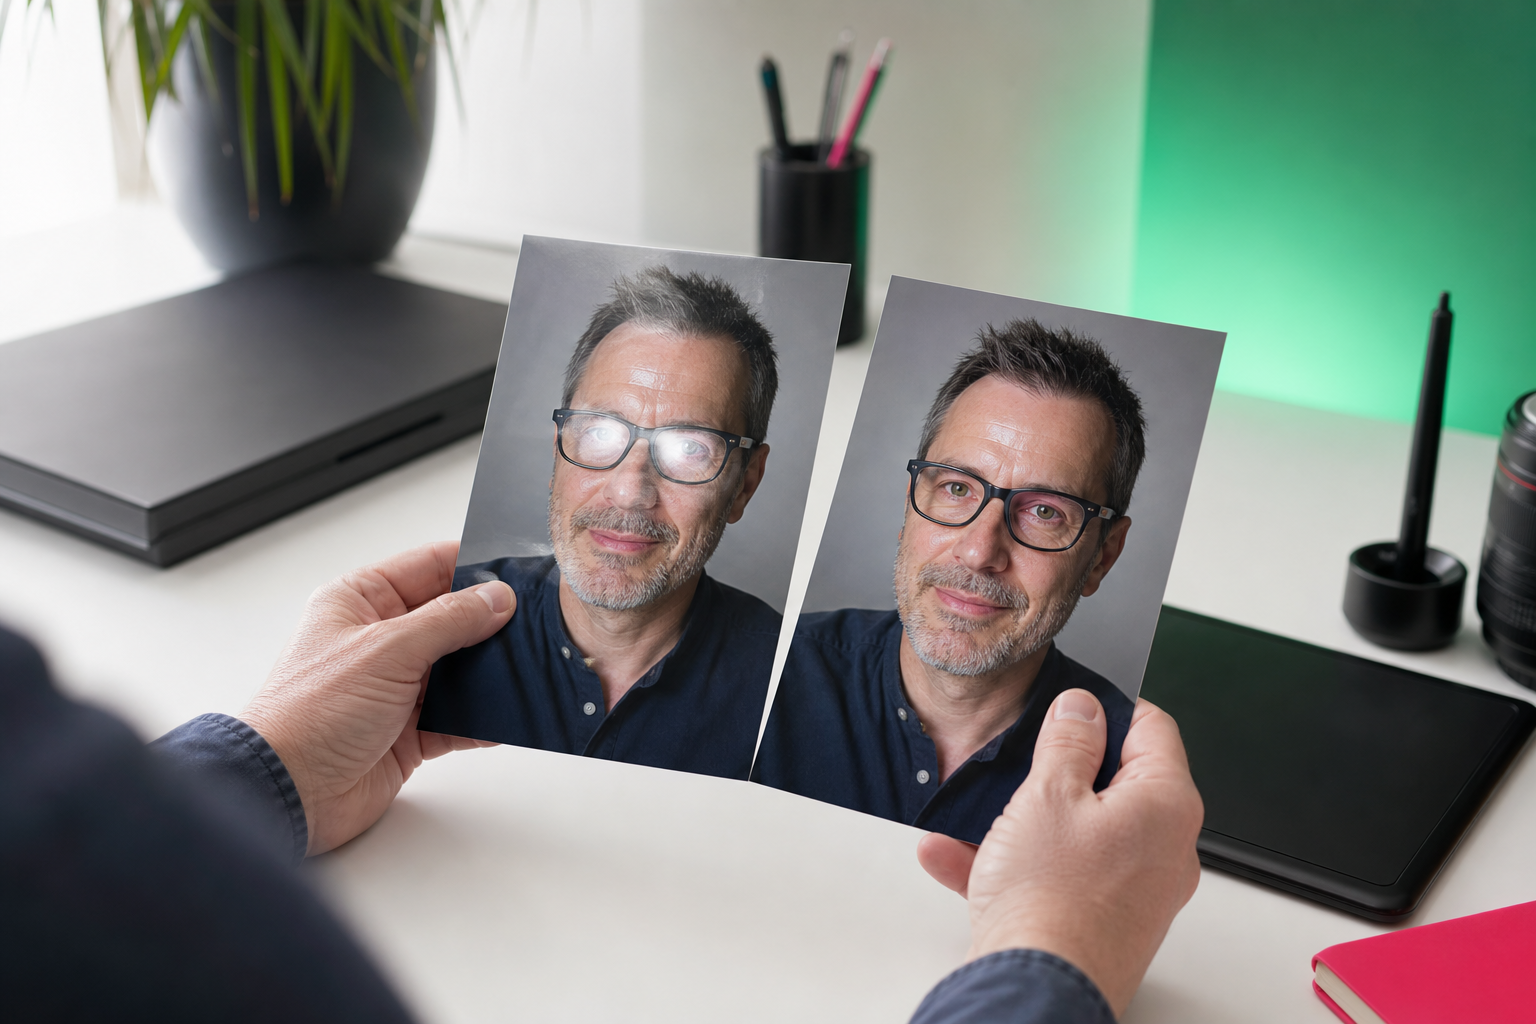
That is why some fixes look convincing and others look like a patch. For example, a small reflection on the edge of eyeglass lenses can often be reduced because nearby lens area, frame lines, and skin texture provide good material to blend from. A large white flash patch covering an entire eye usually cannot be restored perfectly because the eye detail was never recorded.
Photo resolution also matters. Higher-resolution images usually give you more nearby texture to sample. Background complexity matters too. A small hotspot on a plain wall is easier to repair than the same hotspot across eyelashes, text, or a patterned shirt.
What TouchRetouch can help with in still photos
TouchRetouch is a mobile photo-editing app from ADVA Soft GmbH, based in Berlin, Germany. It is designed for photo cleanup on iOS and Android, and it edits still photos only, not video. If you need to fix glare in a recorded clip, this app is not the right tool.
For still images, it can help reduce flash-related distractions using Remove Objects, Clone Stamp, Blur, and careful manual retouching. Remove Objects works well for small bright spots and simple reflections. Clone Stamp is useful when you need to rebuild texture by hand. Blur can soften tiny leftover shine when full removal looks too harsh.
Results depend on the size of the problem and what surrounds it. A small white speck on a background tile is often straightforward. A strong reflection across both lenses of glasses or a large blown-out forehead highlight takes more patience and may only improve rather than disappear completely.
If your main issue is glasses reflections specifically, this remove glasses glare from photo guide goes deeper into lens-specific cleanup. For broader cleanup tasks, TouchRetouch is also useful when you need to remove object from photo on iPhone and Android.
When editing can work—and when a retake is better
Good candidates for cleanup
If you are wondering how to remove glare from a photo, start by looking at the size and location of the bright area. Editing usually works best for small glare on the edge of glasses, a bright reflection in the corner of a window, a shiny spot on skin, or a tiny blown highlight in the background.
These are good candidates because the app can borrow nearby texture and tone. A cheek has surrounding skin. A wall has repeating color. A window frame has straight lines that can be rebuilt with careful sampling. The more consistent the surrounding area, the more natural the result tends to look.
Signs the highlight is too large or too important
Some photos are poor candidates for repair. If the flash created a large white patch across the eyes, wiped out facial detail, covered printed text, or cut through the main subject with a bright flare streak, editing becomes much less convincing.
The same is true when the reflection dominates the composition. A huge hotspot in the center of a portrait or a bright glare covering a product label often leaves too much missing information. In those cases, you are not just removing a distraction. You are trying to invent detail that is no longer there.
A simple decision rule before you start retouching
Use this rule: if the bright area is small and the surrounding texture is clear, edit it. If the bright area covers essential detail, retake the photo if possible. That simple check saves time and sets realistic expectations.
For a retake, prevention helps more than heavy editing. Change your shooting angle slightly, move the light source, turn off flash if possible, clean the lens, or tilt glasses a little so the reflection shifts away from the camera. Even a small angle change can turn a difficult repair into an easy one.
Tools in TouchRetouch that help reduce glare distractions
Use Remove Objects for small bright spots
If you need how to fix bright reflection in a picture without complicated desktop software, start with Remove Objects. This is the main cleanup tool in TouchRetouch for selecting and removing small glare spots, reflections, or blown highlights when the surrounding area is simple enough to rebuild naturally.
The feature gives you two practical ways to select the problem area. Brush works well for irregular shapes such as a shiny patch on skin or a curved reflection on a bottle. Lasso is useful for more defined shapes like a bright corner reflection in a window or a compact flare artifact in the background.
Automatic removal works best on uniform or lightly textured areas. For example, a white hotspot on a painted wall, shirt sleeve, or plain tabletop often blends well after a careful selection. On more detailed areas such as eyelashes, hair, or text, you may need a second pass with manual repair.
Refine edges and texture with Clone Stamp
Clone Stamp is the tool to use when the first cleanup looks smeared, patchy, or slightly off. It lets you copy texture from a nearby area and place it over the reflective patch. That makes it especially useful on skin, clothing, walls, wood grain, and glass surfaces with repeated structure.
For example, if a window reflection interrupts a straight frame line, sample from a nearby section of the same line and rebuild it in short strokes. If a hotspot on skin leaves an uneven patch, sample from skin with similar tone and texture from the same side of the face. Matching direction matters just as much as matching color.
This is also the better tool when the glare sits near important edges. Eyeglass frames, nostrils, lips, and jawlines need precision. Remove Objects can handle the brightest center, then Clone Stamp can restore the surrounding detail more carefully.
Apply Blur only where softening looks natural
Blur is helpful for tiny residual shine that still catches the eye after cleanup. It is not the first tool to use on a large blown-out area, and it should not replace texture rebuilding. Instead, think of it as a finishing step for small hotspots where a slightly softer look feels believable.
Good examples include a tiny sparkle on a background object, a faint leftover shine on a forehead, or a small reflection on glass after the main patch has been reduced. Used sparingly, Blur can help the corrected area blend into the rest of the photo. Used too heavily, it makes the edit obvious.
Use Restore to correct over-editing
Retouching often looks best when you work in small passes, and Restore is useful when one of those passes removes too much. If part of a glasses frame, eyebrow edge, or window line starts to disappear, Restore lets you bring back the original detail selectively.
That matters because glare removal is rarely one perfect swipe. More often, it is a combination of reducing the brightest part first, refining the edges, and restoring any detail that should stay visible. TouchRetouch is built for that kind of cleanup workflow, especially when you remove objects with a swipe in TouchRetouch and then fine-tune manually.
Try TouchRetouch — remove distractions from your photos in seconds. Get it on iOS or Android.
Step-by-step workflow on iPhone and Android
1. Zoom in and assess the bright area
To start how to remove flash from photo on your phone, open the image in TouchRetouch and zoom in closely before making any edits. Look at the hotspot edges, the texture around it, and whether any important detail is still visible underneath. This first check tells you whether the fix is simple cleanup or careful reconstruction.
Pay special attention to areas where shape matters: eyes behind glasses, window frames, facial features, and product edges. A glare spot on a plain wall behaves very differently from one crossing an eyelid or a printed label. If the area is completely white and covers key detail, aim for distraction reduction rather than full recovery.
2. Start with the smallest possible selection
Choose Remove Objects first and select only the brightest center of the glare. This is one of the most effective habits for natural-looking cleanup. Large selections often force the app to rebuild too much at once, which can create smearing or repeated texture.
Use Brush for irregular shine and Lasso for compact or geometric reflections. If a flash spot on glasses has a bright center with softer edges, remove the center first and leave the edge glow for a second pass. The same approach works on shiny skin and small background highlights.
Multiple small passes usually look better than one aggressive pass. For example, a reflection on a car window may clean up well in three short edits: center hotspot, edge streak, then any leftover patch. This controlled method is often the cleanest answer to how to remove glare from a photo on mobile.
3. Rebuild missing texture manually if needed
If the result looks patchy, switch to Clone Stamp. Sample from a nearby area with similar brightness, texture, and direction. On skin, sample from adjacent skin on the same plane of the face. On walls, sample from the same lighting zone. On glass, sample from nearby reflections or transparent areas that match the scene.
Work in short strokes rather than trying to cover the whole area in one move. If you are rebuilding a glasses lens edge, copy along the frame line in small segments. If you are repairing a window reflection, rebuild straight lines first, then fill the flatter areas around them.
This step is especially important when the glare overlaps structure. A hotspot across a shirt seam, eyebrow, or window divider needs shape restoration, not just color replacement. Manual texture repair is often what turns a decent cleanup into a believable one.
4. Soften leftover shine without over-blurring
After the main repair, inspect the area at normal zoom and close zoom. Sometimes the hotspot is gone, but a tiny bright edge still draws attention. That is where Blur can help. Apply it lightly and only to the remaining speck or edge, not the whole corrected region.
This works best on reflective surfaces and background elements where a slightly softer finish feels natural. On skin, use restraint. Too much blur can flatten pores and make the retouched area stand out more than the original shine did.
If you also want to tidy the overall portrait after glare cleanup, subtle portrait finishing can help the image feel balanced. TouchRetouch includes Natural FaceRetouch for gentle portrait enhancement, and these natural face retouch tips for portraits can help you keep the result realistic.
5. Compare before and after before exporting
Before you save, zoom out and compare the edited area with the full image. Check that glasses frames still look straight, eyes still look symmetrical, and window lines still align. A correction that looks perfect at 300% zoom can still look odd when viewed as a whole.
Use Restore if an important edge disappeared or if the area now looks too smooth. This is common around eyelashes, nostrils, jewelry edges, and text. Restoring a small amount of the original often gives a more natural final result than trying to erase every trace of glare.
When you export, TouchRetouch preserves original photo quality and EXIF data. That is useful if you want to keep the image metadata intact after cleanup. If your photo still feels flat after glare removal, these tips to enhance photo quality on your phone can help with the overall finish.
Example fixes for common flash-related problems
Can you remove flash glare from glasses in a photo?
Can you remove flash glare from glasses in a photo? Yes, partial or strong reduction is often possible when the glare is small and some eye detail remains visible. The best cases are bright patches near the lens edge, reflections that do not fully cover the pupil, or glare sitting mostly on one side of the frame.
A practical workflow is to remove the brightest central patch first with Remove Objects, then use Clone Stamp to rebuild the lens edge or nearby skin if needed. If the flash completely covers the eye with a solid white block, a perfect recovery is unlikely because the eye detail is missing. In that case, the goal is to make the glare less distracting, not to recreate the eye exactly.
For glasses-specific examples and prevention tips, the remove glasses glare from photo guide is a useful companion resource.
Reducing bright reflections on windows and glass
Window glare is one of the more common reasons people search for how to fix bright reflection in a picture. Small bright shapes in a corner or along a pane are often manageable because the surrounding glass and frame provide repeatable structure.
Start with Remove Objects for the brightest spots. Then use Clone Stamp to rebuild straight lines, repeated reflections, or frame edges. If the reflection cuts across a major subject seen through the glass, the repair becomes much harder because you are dealing with both transparency and missing detail at the same time.
For example, a bright flash dot in the top-right corner of a shop window is usually easier to remove than a large reflection covering a person’s face behind the glass. Straight architectural lines need extra care, so zoom in and rebuild them in short sections.
Softening shiny spots on skin without over-editing
Flash often creates shiny hotspots on the forehead, nose, cheeks, or shoulders. These are usually better treated as texture-and-tone issues rather than erased in one sweep. A small Clone Stamp correction sampled from nearby skin often works better than a large automatic removal.
If a tiny highlight remains, Blur can soften it slightly so it stops catching the eye. Keep the correction local. Over-editing skin is one of the fastest ways to make a portrait look artificial. If you want broader portrait cleanup after reducing shine, Natural FaceRetouch can support a more polished look while preserving natural facial features.
This is a good example of realistic editing. You are not trying to remove every sign of light from the face. You are reducing the distraction so the portrait looks balanced and natural.
Cleaning up small blown-out highlights in the background
Background hotspots are often the easiest flash-related issue to fix because they usually do not cover important subject detail. A tiny white spot on a wall, floor tile, glossy decoration, or distant object can often be removed cleanly with a small selection.
These edits work well because the app has simple surrounding information to blend from. A plain painted wall, soft sky area, or blurred background object gives Remove Objects enough context to rebuild the area naturally. If needed, a quick Clone Stamp pass can tidy the edges.
For example, a bright flash speck on a restaurant wall behind your subject is a strong candidate for cleanup. The same is true for a small reflection on a polished table in the lower corner of the frame. These are ideal cases for mobile retouching.
What to do with mild lens flare after taking the shot
If you are looking for how to reduce lens flare in a photo after taking it, the answer depends on the flare shape. Mild flare artifacts such as small circles, faint haze patches, or isolated bright dots can often be reduced if they are separate from the main subject.
Large flare streaks crossing a face, skyline, or product are much harder to fix convincingly. They often alter contrast and color over a wide area, not just brightness. In those cases, reducing the most distracting part is realistic, but complete removal may not look natural.
A practical example: a small flare orb near the edge of the sky is often removable with Remove Objects. A diagonal flare streak running from the top corner across a person’s eyes is a much more difficult repair. For that type of problem, prevention during shooting usually matters more than heavy retouching.
Best practices for natural-looking results
Match texture, tone, and direction of light
The most believable edits come from sampling nearby areas that actually match the scene. If you use Clone Stamp, copy from skin with the same lighting, glass with the same transparency, or fabric with the same weave direction. Matching color alone is not enough.
This is especially important when learning how to reduce lens flare in a photo after taking it. Flare often changes local contrast, so your replacement area needs to fit both the texture and the light pattern around it.
Avoid editing the whole area at once
Small, controlled edits usually look better than one large removal. Start with the brightest center, then clean the edges, then refine any structure. This layered approach gives you more control and reduces the risk of obvious smearing.
It also makes Restore more useful. If one pass removes too much, you only need to bring back a small section instead of undoing the entire repair.
Know when subtle improvement is enough
Not every glare problem needs to vanish completely. In many photos, reducing the hotspot so the viewer notices the subject first is already a successful result. This is often the best outcome when the flash affected a detailed area such as eyes, text, or reflective jewelry.
That honest mindset helps you avoid over-editing. A slightly visible reflection can still look more natural than a perfectly smooth patch that does not match the rest of the image.
Common mistakes that make glare edits obvious
The most common mistakes are overusing Blur, sampling from the wrong texture, and ignoring the full image after zoomed-in edits. A forehead can become too soft, a window line can bend, or a glasses frame can lose its shape if you focus only on the hotspot itself.
TouchRetouch is designed to make photo cleanup simple on mobile, but scene complexity still matters. The app works best when the correction is built from nearby visual information, not when it has to replace large missing detail from scratch.
Clean up distracting glare and reflections with TouchRetouch
Download options for iPhone and Android
If you want a practical photo retouching app for cleaning up glare, reflections, and other distractions, TouchRetouch is available on iOS and Android. It is built specifically for object removal and cleanup, which makes it a good fit for flash spots, reflective patches, and minor flare artifacts in still photos.
What to expect before you start editing
TouchRetouch is free to download; premium AI features require a paid subscription. Check the App Store or Google Play for current pricing, which varies by region. Automatic cleanup works best on simple backgrounds, while more detailed scenes often need Clone Stamp refinement and careful manual retouching.
Clean up your photos with TouchRetouch — download now on the App Store or Google Play.
Frequently Asked Questions
Can you remove flash glare from glasses in a photo if the eyes are partly covered?
Yes, partial removal is often possible if some eye detail is still visible. The best approach is to reduce the brightest glare first, then rebuild nearby lens or skin texture carefully. If the eye is completely covered by a solid white patch, a perfect recovery is not realistic.
How do you fix a bright reflection in a picture without making it look blurry?
Use small selections and rebuild texture with Clone Stamp instead of relying on Blur for the whole fix. Blur works best only as a finishing touch on tiny leftover shine. Matching nearby texture and edges is what keeps the result sharp and natural.
Can lens flare be reduced after taking a photo?
Yes, mild lens flare can often be reduced after the shot if it appears as small isolated spots or limited haze away from the main subject. Large flare streaks crossing important detail are much harder to repair convincingly. In those cases, reducing the distraction is a more realistic goal than full removal.
Why does a flash hotspot sometimes stay white even after editing?
It stays white when the original photo recorded no detail in that area. Editing can blend surrounding texture over small spots, but it cannot truly recover detail that was completely blown out. That is why large overexposed patches are the hardest flash problem to fix.
Does TouchRetouch work for glare removal in videos or only photos?
TouchRetouch works for photos only. It does not support video editing. If your glare problem is in a still image on iPhone or Android, the app can help reduce reflections and hotspots with its photo retouching tools.
Flash glare is fixable more often than many people think, but the best results come from knowing what can actually be repaired. Small reflections, shiny patches, and minor hotspots usually respond well to careful cleanup. Large white blowouts over important detail usually do not.
If you are deciding how to remove flash from photo, start small, work in passes, and aim for a natural improvement instead of a forced perfect patch. TouchRetouch gives you a simple mobile workflow for that kind of cleanup, whether the issue is glasses glare, window reflection, shiny skin, or a small flare artifact.
FAQ
Can you remove flash glare from glasses in a photo?
Yes, you can remove flash glare from glasses in a photo if some eye detail is still visible or if you can borrow detail from another frame, but fully blown-out glare is much harder to fix naturally.
How do you remove glare from a photo after taking it?
To remove glare from a photo after taking it, lower highlights and whites first, then use selective retouching, cloning, or healing to reduce bright patches while preserving natural texture.
How do you fix a bright reflection in a picture?
You fix a bright reflection in a picture by checking whether the area still contains detail, then reducing brightness and carefully blending nearby texture or detail into the reflective spot.
How do you reduce lens flare in a photo after taking it?
You can reduce lens flare in a photo after taking it by adjusting contrast and highlights, then removing flare artifacts with local edits, healing tools, or content-aware retouching where possible.
Can every flash hotspot be removed completely?
No, not every flash hotspot can be removed completely, because areas that are pure white with no remaining detail often require reconstruction rather than true recovery.